

Bullish Harami Cross and Bearish Harami Cross: How to Spot One and When to Trust It
Want the daily routine? Get the free 15-Minute Swing Trader’s Checklist. Get it free →
By Spencer Li, CFTe · Last updated: 23 July 2026
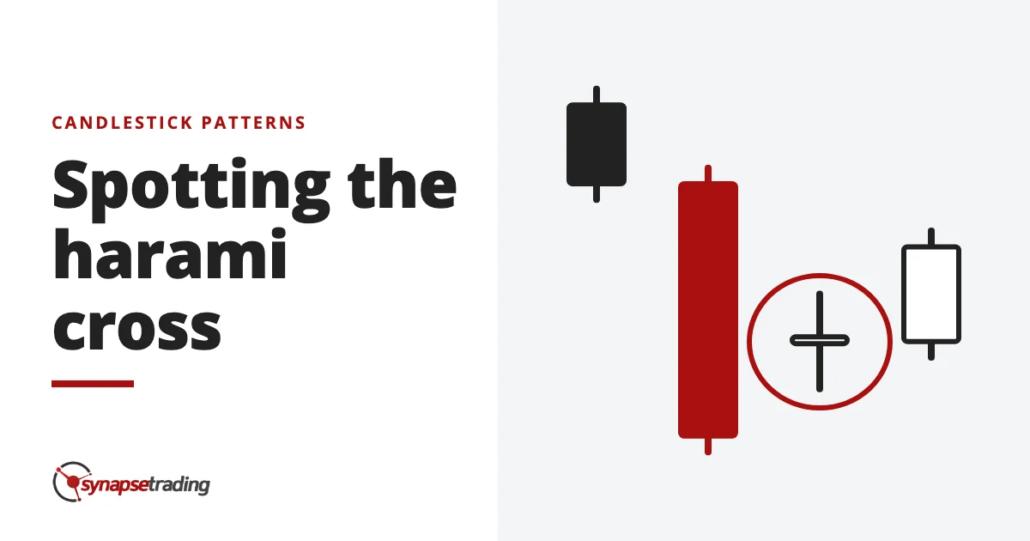
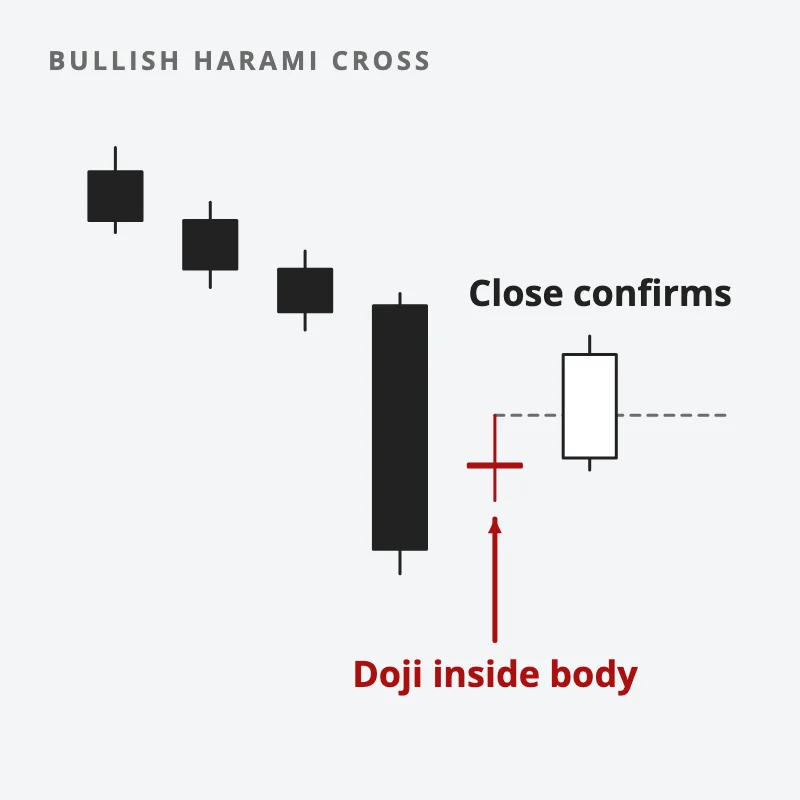
A harami cross is a two-candle reversal pattern. A long candle in the direction of the trend is followed by a doji, a candle that opens and closes at almost the same price, and the doji’s open and close sit inside the body of the long candle. A bullish harami cross forms after a downtrend and warns that the selling is drying up, while a bearish harami cross forms after an uptrend and warns that the buying is drying up.
On its own, the pattern only tells you the trend has stalled. It becomes a trade when a later candle closes in the new direction, and it deserves the most attention when it forms at a support or resistance level that already mattered before the doji showed up.
Why would anyone call a candle pregnant?
Harami is an old Japanese word for pregnant. The long first candle is the mother, and the small doji tucked inside its body is the baby.
Steve Nison, whose 1991 book brought candlestick charts to Western traders, notes that the harami cross is sometimes called the “petrifying pattern”, which is a rather dramatic name for a candle where nothing happened. But that is the point. One side was firmly in control, and then the next session opened and closed in the same place, so the winning side has simply stopped pushing.
Do note that the rule is about bodies. Nison describes the harami as a cousin of the Western inside day, except that only the real bodies have to nest. The doji’s shadows, the thin lines that mark its high and low, may poke outside the first candle’s body, and Alan Farley says the same in The Master Swing Trader. So a scanner that rejects a pattern because the doji’s wick sticks out is stricter than the textbook.
A plain harami is the same idea with a small solid candle in second place. Nison rates the cross version as a major reversal signal, because a doji is about as clean a picture of a stalemate as one candle can give you.
What does the doji actually tell you?
In November 2025, I walked through a daily chart of the QQQ in my weekly outlook. Prices had been heading up for a few days, and then, as I said at the time, there was “a bit of a doji”, which was “signifying indecision”. The next day, “the market actually closed below the low of the doji”, and that close is what confirmed the correction for me.
That was a lone doji rather than a full harami cross. The logic is the same, though. The doji asks the question, and the next close answers it.
Indecision means nobody knows yet who won. After a harami, Nison writes, the market usually eases into a congestion band, which is a polite way of saying it often goes sideways for a while instead of turning cleanly. His picture for every “reversal pattern” is the brake lights on the car in front of you, and the car may stop, or it may pull off again.
Gregory Morris adds a twist in Candlestick Charting Explained. A harami is the first two days of the Three Inside Up or Three Inside Down, so a third candle does the confirming. A harami cross could also turn out to be the start of a Rising or Falling Three Methods, which is a continuation pattern. The same two candles can begin a reversal or a short pause, and you only find out which afterwards.
How do the bullish and bearish versions differ?
They are mirror images.
| Bullish harami cross | Bearish harami cross | |
|---|---|---|
| Forms after | A downtrend | An uptrend |
| First candle | A long down candle, sellers in control | A long up candle, buyers in control |
| Second candle | A doji whose open and close sit inside the first body | A doji whose open and close sit inside the first body |
| What it warns | Sellers are running out of conviction | Buyers are running out of conviction |
| Confirmed by | A close above the doji, or higher | A close below the doji, or lower |
| Fails when | Price closes below the doji’s low and keeps falling | Price closes above the doji’s high and keeps rising |
There is one odd difference that most guides skip. Nison found that harami crosses do call bottoms, but they work better at tops. His reasoning, from the doji chapter, is that a falling market “could fall due to its own weight”, so a doji in a downtrend needs more confirmation before you trust it. Hence, a bullish harami cross after a steep drop is the version I would be slowest to act on.
You do not need to watch every candle to use this pattern, and my free 15-minute swing trader checklist is the daily routine I use myself.
What counts as confirmation?
Confirmation is a later candle closing in the new direction. The real question is how far it has to close. Farley lays out a ladder of entries for the harami, from the small candle out to the big one, and I find a three-rung version easiest. For a bullish harami cross, from fastest to safest:
- The doji’s range. A close above the doji’s high. This is the earliest signal, and also the one most likely to be wrong.
- The far end of the first body. A close above the open of the long down candle, which means price has taken back the whole of that first day’s drop.
- The first candle’s extreme. A close above the long candle’s high, shadow included. By the time this happens, a good part of the move is usually gone.
For a bearish harami cross, flip everything, so the rungs become a close below the doji’s low, then below the open of the long up candle, then below that candle’s low.
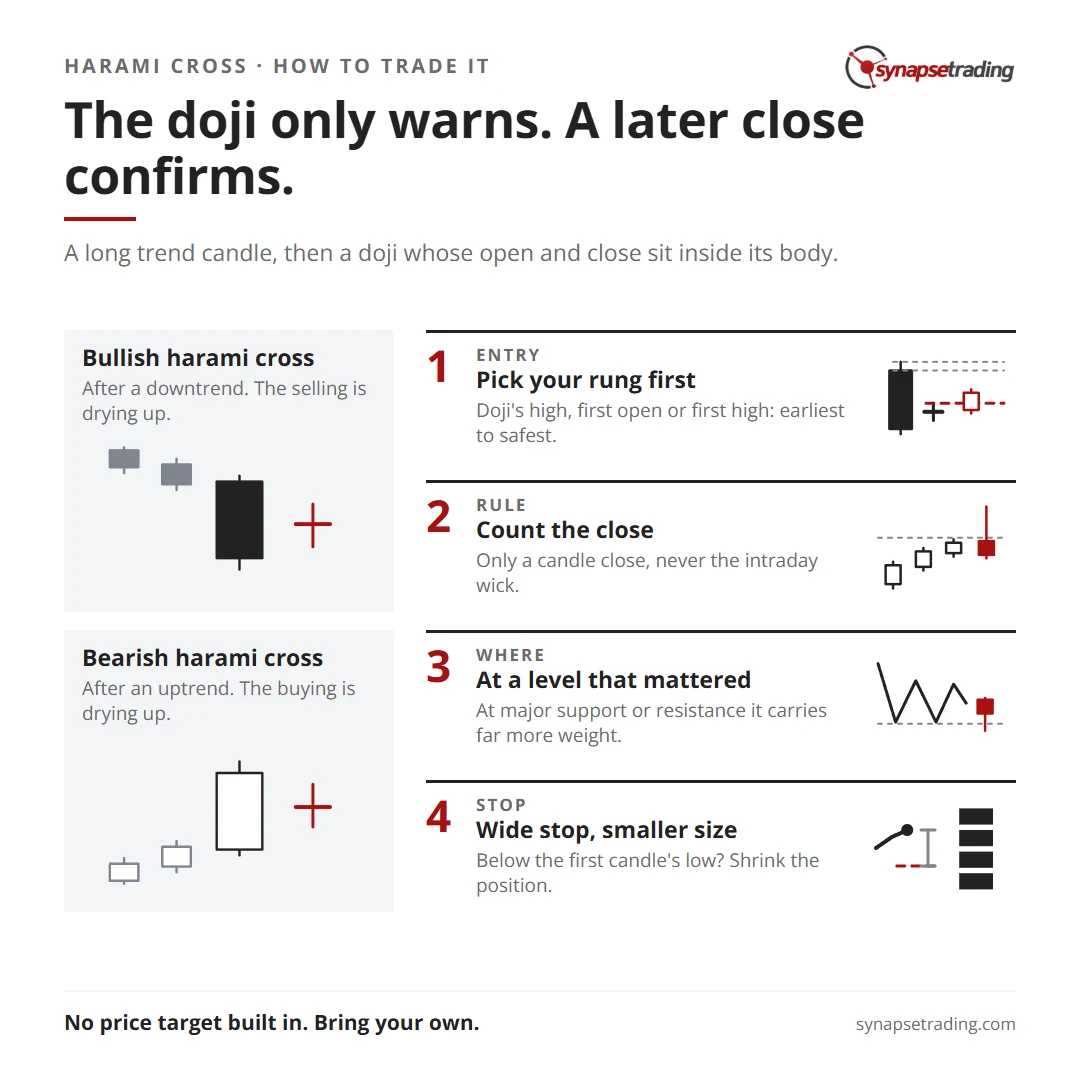
Whichever rung you pick, the word that matters is close. Personally, I only count a candle close, never the intraday wick and never the feeling that “it’s about to”, because a wick through a level at 3pm can be wiped out by the closing bell. So choose the rung before the pattern forms, while you are still calm, and leave the person staring at the candle with nothing to decide.
Where does a harami cross deserve more weight?
Suppose you run a candlestick scanner across a few hundred stocks tonight. It will hand you a pile of harami crosses, most of them sitting in the middle of nowhere.
The second half of Nison’s book rests on what he calls the Rule of Multiple Technical Techniques, which says that the more independent signals line up at one price, the better the odds. Three are worth checking.
- Location. A bullish harami cross at major support, or a bearish one at major resistance, carries far more weight than one floating in the middle of a range.
- Momentum. In Beyond Candlesticks, Nison notes that a doji or harami at an overbought or oversold extreme is far more actionable. His extreme bands differed from market to market, so a reading that is stretched for one stock can be ordinary for another.
- The trend before it. The pattern needs something to reverse, and a harami cross after a long, fast move tells you more than one after a gentle drift.
My own annotated charts tell a similar story. As at June 2026, I had gone back over 734 of them, from June 2024 to May 2026, and the reversals I marked came after a fast drop into a level that mattered for more than one reason. The candles I marked there were mostly pin bars, hammers and big white candles, and a harami cross fits the same frame.
Is a harami cross just noise?
On 17 September 2026, a trader on Reddit’s r/technicalanalysis posted a bullish harami cross on Starbucks, sitting near the 200-day moving average after a long decline. To their credit, they raised the obvious objection themselves: “one small candle does not change the larger price action by itself.”
I agree with that. A single doji does not reverse a trend. What it can do is shift the odds at a level where the odds were already shifting, which is why I treat a harami cross as a reason to look harder at the chart rather than a reason to buy.
And I should be honest about a limit. As at October 2026, I cannot tell you how harami crosses have done in my own trading. My public trade log has every trade since April 2024, dated, losses left in, but it does not record which candle pattern sat behind each entry, so that count is simply not on record.
How would you trade a harami cross?
Start with the use most people skip. You do not have to enter on the pattern at all, because a reversal signal often means “exit” more than “reverse”. Say you are already long, a bearish harami cross prints at resistance, and the next candle closes below the doji. That is a reasonable moment to take some profit or tighten your stop.
If you do want to enter, the structure looks like this.
| Bullish harami cross, long | Bearish harami cross, short | |
|---|---|---|
| Entry | On the close of the confirming candle, at the rung you chose earlier | On the close of the confirming candle, at the rung you chose earlier |
| Tight stop | Below the doji’s low | Above the doji’s high |
| Wide stop | Below the first candle’s low | Above the first candle’s high |
| Target | None built in, so bring your own | None built in, so bring your own |
The wide stop can sit a long way from the entry, because the first candle is long by definition. So shrink the position until the distance to the stop risks the same share of your account as any other trade. Imagine your rule is to risk 1% per trade, and the wide stop is twice as far away as usual. The position should then be half its usual size, and if the stop is hit, the loss is still 1%.
Then pick an exit. Nison is clear that candlesticks give no price targets, so the target comes from elsewhere, such as the next support or resistance level, a Fibonacci retracement, a trailing stop or a fixed reward-to-risk ratio. Decide before you enter, because a trade with no planned exit gets one chosen later by fear or greed, usually at the worst moment.
A plan like this is easier to keep with a routine, and the free 15-minute swing trader checklist is the one I run every day.
FAQ
What is a harami cross?
It is a two-candle reversal pattern. A long candle in the direction of the trend is followed by a doji whose open and close sit inside the first candle’s body, so the trend has stalled.
Is a harami cross bullish or bearish?
It can be either. The bullish version forms after a downtrend and warns of a turn up, and the bearish version forms after an uptrend and warns of a turn down. Steve Nison found it works better at tops.
What is the difference between a harami and a harami cross?
In a harami, the small second candle has a solid body. In a harami cross, it is a doji, and Nison treats the cross as the stronger signal.
Does the doji have to sit completely inside the first candle?
Only its open and close do. The doji’s shadows can extend past the first candle’s body, because the pattern is defined by the bodies.
How do you confirm a harami cross?
Wait for a later candle to close in the new direction. For a bullish harami cross, that is a close above the doji’s high, the first candle’s open or the first candle’s high, from earliest to safest. For a bearish one, flip each level.
Does a harami cross have a price target?
No. Candlestick patterns do not project targets, so set your exit from the next support or resistance level, a Fibonacci level, a trailing stop or a fixed reward-to-risk ratio before you enter.
Do you wait for the close, or do you act on the doji itself? And has a harami cross ever kept you out of a bad trade, or talked you into one? Let me know in the comments.
The harami cross is one of the reversal patterns in The Definitive Guide to Candlestick Patterns. If you want to tell a real turn from the kind of pause Morris warns about, read Continuation Price Patterns vs. Reversal Price Patterns, and the rest are in my free trading guides.
And if you want a daily routine that fits around a full-time job, grab the free 15-minute swing trader checklist.
About the author. Spencer Li is The 15-Minute Trader and the founder of Synapse Trading. He is a Certified Financial Technician (CFTe) with 15+ years of trading, run from 70+ countries. He holds a B.Acc and B.BM from SMU. Every trade he takes is public, dated, losses left in. He teaches low-risk swing trading in 15 minutes a day, one system for any market.
Education, not financial advice. Synapse Trading is not licensed by MAS to advise on investment products. Trading carries risk of loss, and past performance is not indicative of future results.
Want the daily routine? Enter your email for the free 15-Minute Swing Trader's Checklist.
Free 5-page PDF, then occasional trading emails. Education only, not financial advice. Unsubscribe anytime. Kit stores your email in the US: see our privacy policy.
Want to learn the full method? The Trading Mastery Program teaches the 4 strategies I have traded since 2011. It suits beginners and experienced traders.
Rather follow the trades as they happen? Daily Trading Signals is our Telegram channel: my trade ideas with entry, stop and exit, and every trade is public.
Questions about this post? Ask in the free Telegram channel →
Educational content only, not personalised financial advice. Trading carries risk, including loss of capital. Past performance is not indicative of future results. Synapse Trading is not licensed or regulated by MAS.

