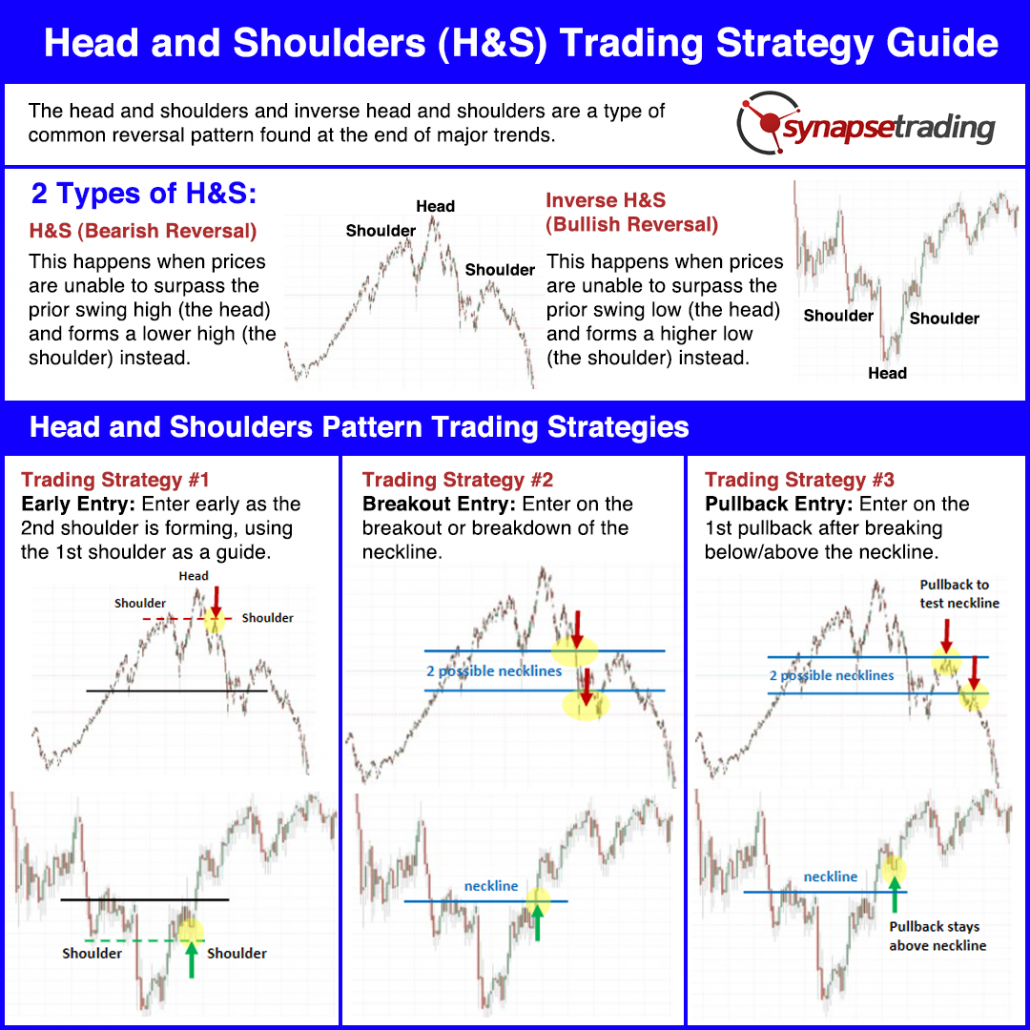
The head and shoulders and inverse head and shoulders are a type of common reversal pattern found at the end of major trends.
The bearish version is called the head and shoulders pattern, while the bullish version is called the inverse head and shoulders pattern.
In this post, I will show you how to take advantage of the head and shoulders pattern to identify major market reversals, and the best trading strategies for this price pattern.
What is a Head and Shoulders Pattern?
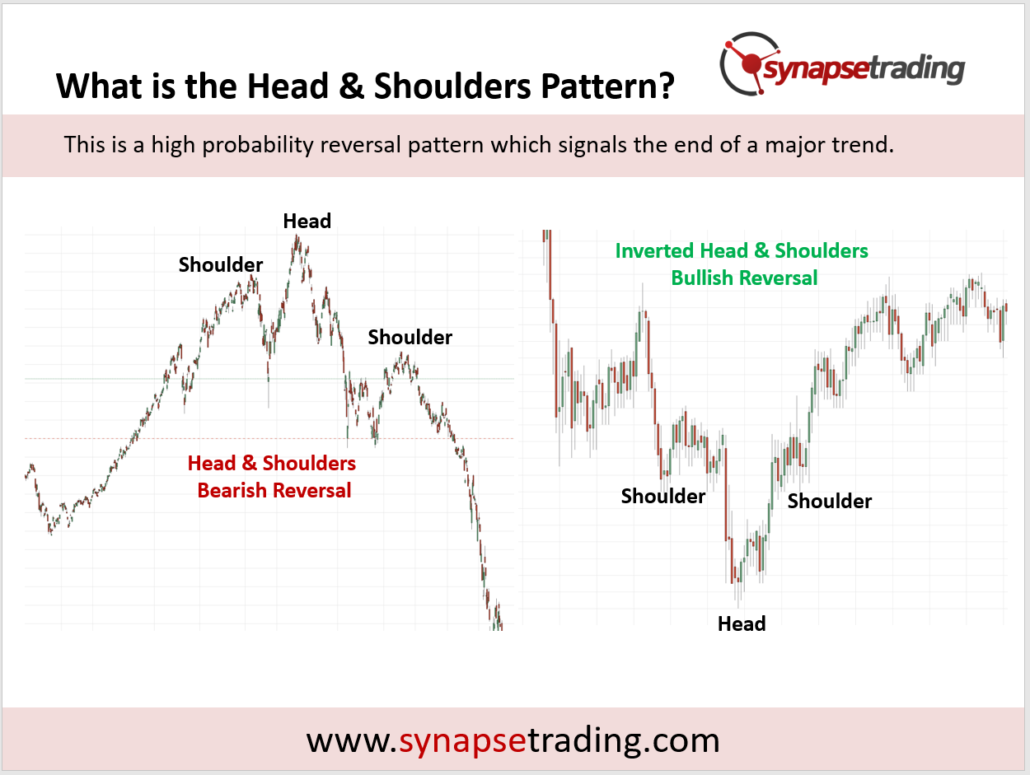
The head and shoulders and inverse head and shoulders are another type of common reversal patterns found at the end of major trends.
When prices are unable to surpass the prior swing high (the head) and forms a lower high (the shoulder) instead, this forms the bearish head and shoulders reversal pattern.
When prices are unable to surpass the prior swing low (the head) and forms a higher low (the shoulder) instead, this forms the bullish inverse head and shoulders reversal pattern.
Head and Shoulders Pattern Psychology
Here is a quick recap of the 2 types of patterns:
- Head and shoulders pattern – bearish reversal
- Inverse head and shoulders pattern – bullish reversal
Head and Shoulders Pattern Psychology (Bearish Reversal)
In the head and shoulders pattern, bulls (buyers) are originally in control of the market, and the market is in an uptrend.
At some point in time, bears (sellers) try to take control, pushing down prices, which creates the “left shoulder” of the pattern.
Bulls resume control and push prices to new highs, which forms the “head” of the pattern.
Bears try to fight for control again, pushing prices back down to the level of its first push.
Bulls try one last time to resume control by pushing prices up, but it is unable to make new highs. This forms the “right shoulder” of the pattern.
Finally, bears take full control and push prices further down.
Bears are now in control of the market, and the market is in a downtrend.
Inverse Head and Shoulders Pattern Psychology (Bullish Reversal)
In the inverse head and shoulders pattern, bears (sellers) are originally in control of the market, and the market is in a downtrend.
At some point in time, bulls (buyers) try to take control, pushing up prices, which creates the “left shoulder” of the pattern.
Bears resume control and push prices to new lows, which forms the “head” of the pattern.
Bulls try to fight for control again, pushing prices back up to the level of its first push.
Bears try one last time to resume control by pushing prices down, but it is unable to make new lows. This forms the “right shoulder” of the pattern.
Finally, bulls take full control and push prices further up.
Bulls are now in control of the market, and the market is in an uptrend.
Head and Shoulders Pattern Trading Strategies
There are 3 main strategies, which focus on the taking advantage of the change in trend, and the difference lies in how early to enter the reversal when it happens.
- Early Entry: Enter immediately
- Pre-Breakout Entry: Enter immediately
- Pullback Entry: Wait for a pullback after the breakout
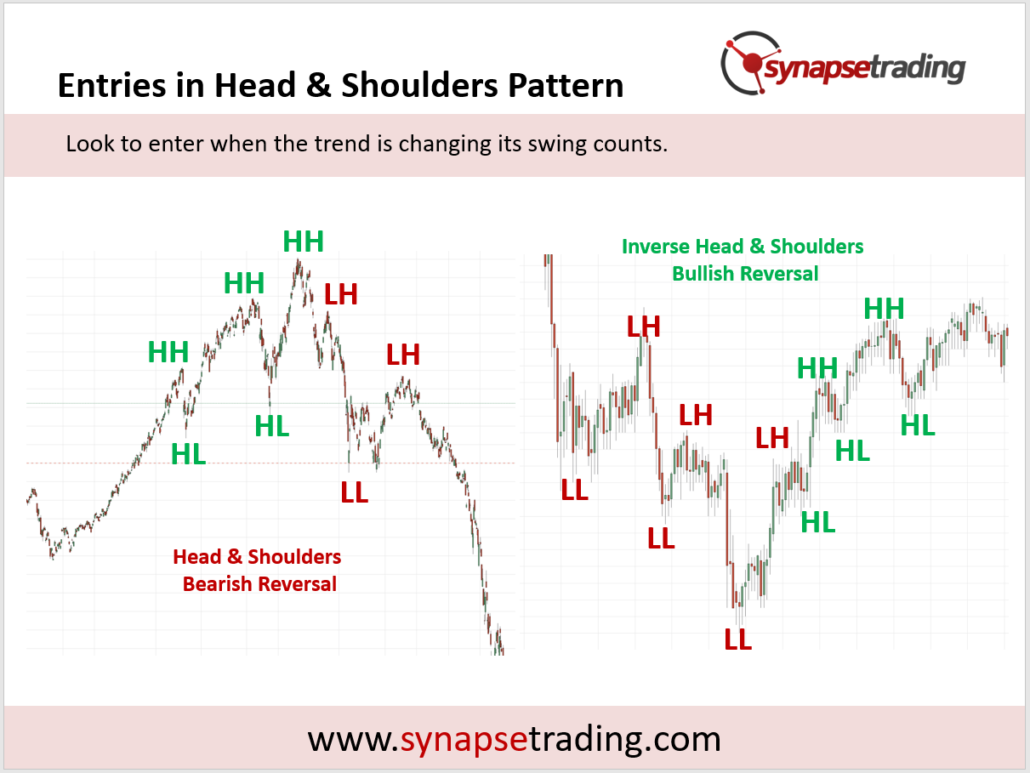
Since the head and shoulders is a reversal pattern, we can expect to see its swing counts change as the pattern unfolds.
For the bearish reversal of the head and shoulders pattern, we see the swing counts change from a series of higher highs and higher lows, to one of lower highs and lower lows.
For the bullish reversal of the inverse head and shoulders pattern, we see the swing counts change from a series of lower highs and lower lows, to one of higher highs and higher lows.
For all 3 strategies, they involve entering a position at various stages during this transition of swing counts.
Now, let’s go through each strategy in greater detail.
Trading Strategy #1: Early Entry
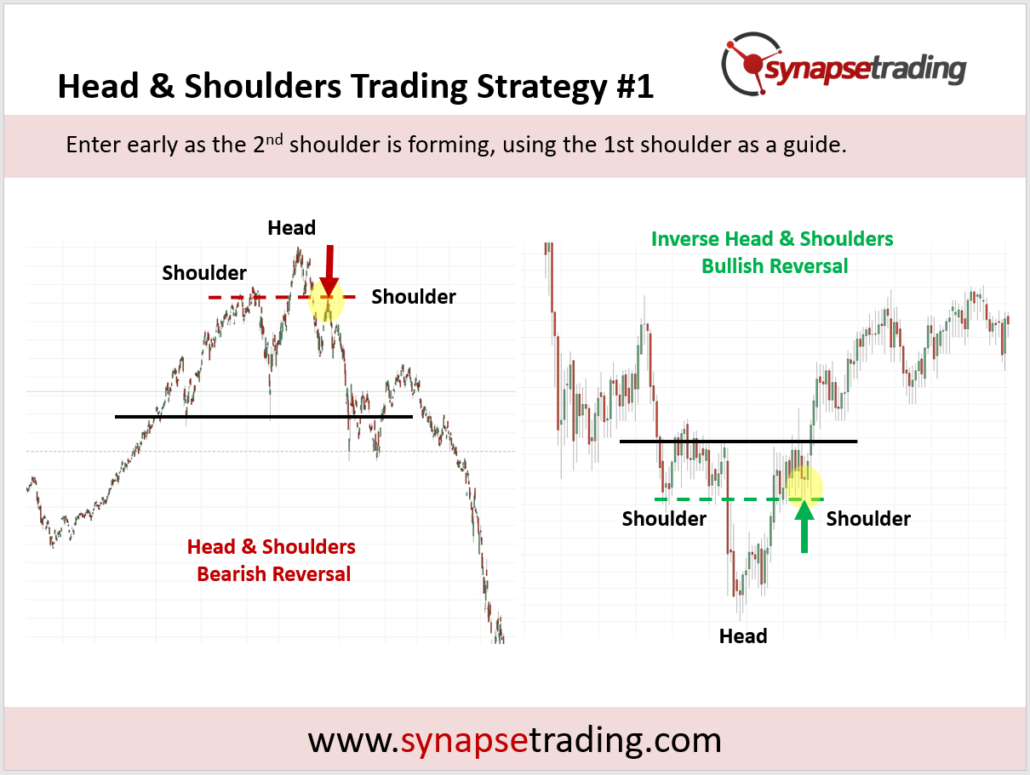
Our first strategy for the head and shoulders price pattern is to enter early as the 2nd shoulder (right shoulder) is forming, by using the 1st shoulder (left shoulder) as a guide.
As mentioned previously, the head and shoulders pattern is a reversal pattern, and we can expect to see swing counts change as the pattern unfolds.
The early entry takes advantage of this by shorting on the first LH (bearish H&S reversal), or going long on the first HL (bullish inverse H&S reversal). You can scroll up to the previous infographic (entries in head & shoulders pattern) to observe where the colour changes.
In the examples above, we see a prior trend, followed by the head and shoulders pattern which attempts to change the direction of the trend.
The first sign of the change of trend comes from the 2nd shoulder (right shoulder), because it is not able to reach the same level or exceed the head, which shows that the existing trend is weakening.
Most of the time, the 2nd shoulder (right shoulder) will form at roughly the same level as the 1st shoulder (left shoulder). This means that we can pre-empt the potential turning point of prices, and use that for our early entry.
For trading, we would look to enter near the point of the 2nd shoulder, keeping an eye for reversal candlestick bars/price action and volume which signals that momentum is weakening and it cannot go past the shoulder level.
We can then look to place our stoploss (SL) somewhere between the shoulder and the head levels.
This strategy works best if the price movement to resume the current trend is weak, and looks to be struggling just to touch the shoulder level, which suggests that it will most likely not be able to go past.
Trading Strategy #2: Breakout Entry
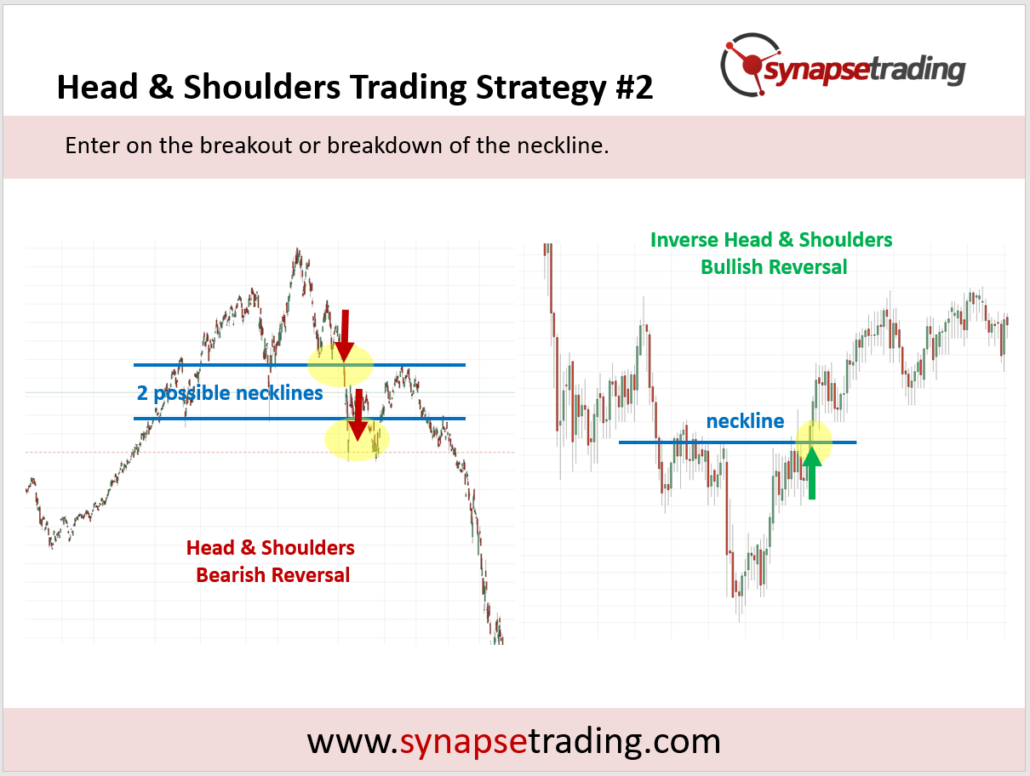
Our second strategy for the head and shoulders price pattern is to enter on the breakout/breakdown of the neckline.
As mentioned previously, the head and shoulders pattern is a reversal pattern, and we can expect to see swing counts change as the pattern unfolds, meaning a LH & LL if we want to short, and a HL & HH if we want to go long.
In the previous strategy (early entry), the entry was given on the first LH (shorting a bearish H&S reversal), or the first HL (going long on a bullish inverse H&S reversal).
In this strategy (breakout entry), the entry is given on the LL (shorting a bearish H&S reversal), or the HH (going long on a bullish inverse H&S reversal). Breaking the neckline automatically gives rise to a LL and HH respectively.
In the examples above, we can see the neckline (blue horizontal line) which denotes this crucial price level. Sometimes, if there is no clear neckline, this might result in a zone, or multiple necklines.
For trading, we would look to enter just as the breakout occurs at the neckline, keeping an eye for strong price action and volume which signals conviction in the breakout.
We can then look to place our stoploss (SL) somewhere between the neckline and the 2nd shoulder (right shoulder).
This strategy works best if there is a clear neckline which price is trying to break, followed by strong price momentum on the breakout.
If the price action is choppy/volatile, or if the neckline is not clear, then it would be better to wait for a pullback and use Strategy #3 (pullback entry) instead.
Trading Strategy #3: Pullback Entry
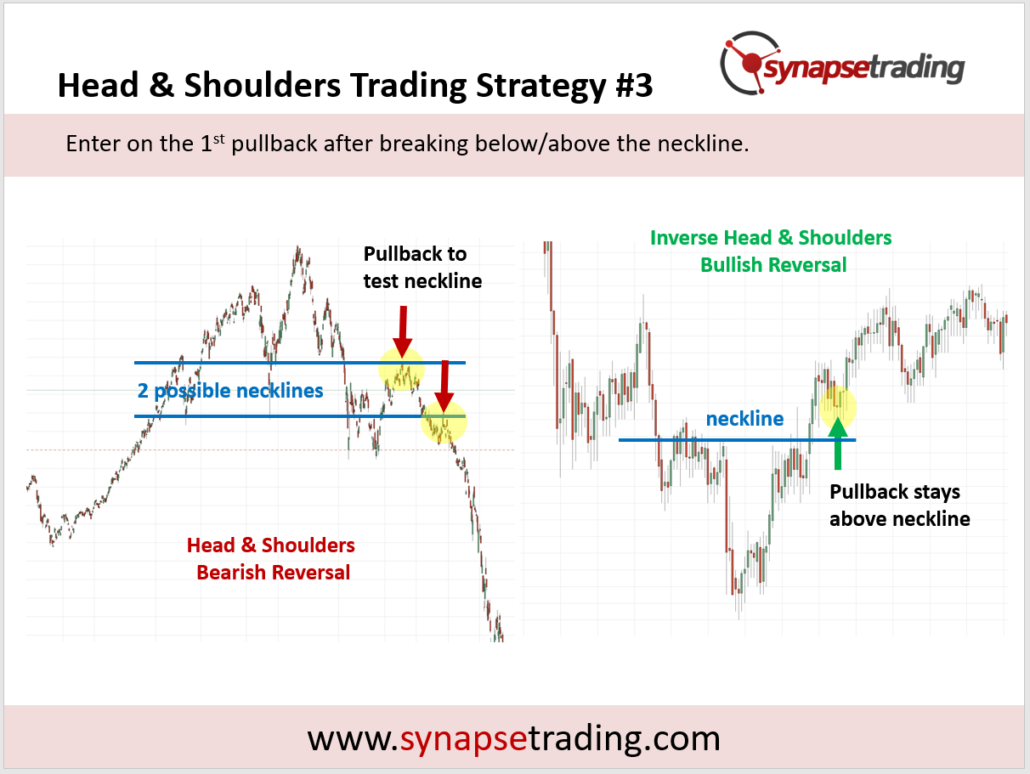
Our third strategy for the head and shoulders price pattern is to wait for the break of the neckline to occur (Strategy #2), then enter on the 1st pullback after that happens.
As mentioned previously, the head and shoulders pattern is a reversal pattern, and we can expect to see swing counts change as the pattern unfolds.
In the previous strategies, we shorted on a LH (Strategy #1) and LL (Strategy #2); or went long on a HL (Strategy #1) and HH (Strategy #2).
In Strategy #3, we will be shorting on the next LH (LH > LL > LH), or going long on the next HL (HL > HH > HL).
Therefore, since the new trend is slightly more established, the chance of success is higher, but the reward-to-risk ratio (RRR) will not be as good as the prior strategies. As we mentioned many times before, every trade is a trade-off between the hit rate and the RRR.
In the examples above, we can see where the 1st pullback occurs (yellow highlight), depending on which neckline you treat as the breakout.
Most of the time, the pullback will retrace to touch the neckline, but if the breakout momentum is strong, the pullback may not come all the way back to the neckline.
For trading, we would look to enter near the point of the pullback (usually near the neckline), keeping an eye for reversal candlestick bars/price action and volume which signals that momentum is weakening and it cannot go past the neckline.
We can then look to place our stoploss (SL) somewhere between the neckline and the 2nd shoulder (right shoulder).
If you have already entered a position during the breakout, this strategy can be an opportunity for you to add on more positions.
Profit Target for the Head and Shoulders Pattern
Once a head and shoulders pattern is completed, one of the most useful things about it is its ability to provide a price projection, which can be used to estimate a minimum profit target for your trade.
This can be done by taking the maximum height of the pattern (distance from the head to the neckline), and projecting that distance from the breakout point.
If the neckline is not clear or there are multiple necklines, it is advisable to go with the most conservative option, and use a smaller projection.
In the chart above, the maximum height of the head and shoulders pattern is indicated by the blue rectangular box, which is then used as a price projection at the breakout point.
The horizontal arrow indicates the price level which serves as the minimum profit target for the head and shoulders pattern breakout.
This price projection technique can be used in conjunction with other methods, such as support and resistance levels, and if there is any confluence, gives an added layer of confirmation.
Tips from the Trading Desk
- Make sure the trend is in the late stage – the longer the trend has been running, the more exhausted it is likely to be.
- Use the completed pattern for price projection – shoulders tend to be roughly the same height.
- The size of the pattern should be proportional to the trend it is trying to reverse.
As you can see from the chart above, this is an example of a strong trending market (3 green rectangle boxes), which ended in a head and shoulders bearish reversal (1 red rectangular box).
This means that for the whole move up, if we only measure the vertical distance (height), the trend accounts for 75%, and the reversal pattern accounts for 25%. This is within the healthy range, meaning the pattern size is proportional to the whole trend.
Typically, a reversal pattern works best when its height is about 25% to 33% (1/4 to 1/3) of the whole move.
If the pattern size is less than 25%, the pattern is too small to reverse the trend, which means that it might likely lead to a consolidation before the trend resumes, or the reversal pattern is still in the midst of forming, and might evolve to something bigger.
If the pattern is large than 33%, the pattern is too large to be classified as a head and shoulders pattern, and it could just be large swings within a wide range.
I have not come across any authors talk about price pattern proportionality in any books, but I see a lot of new traders making this mistake when trying to identify price patterns. And this applies to other price patterns as well.
Now that I have shared the various trading strategies for the head and shoulders price pattern, which is your favourite strategy?
Let me know in the comments below.

If you would like to learn all the different price chart patterns, also check out: “The Definitive Guide to Trading Price Chart Patterns”
Spencer is an avid globetrotter who achieved financial freedom in his 20s, while trading & teaching across 70+ countries. As a former professional trader in private equity and proprietary funds, he has over 15 years of market experience, and has been featured on more than 20 occasions in the media.

